Thursday, December 31, 2009

NYR #25 Grocery Bag Dispenser

Just in the nick of time I finished my final project of my New Year's Resolution last night!
I loosely followed this tutorial (I clearly didn't piece together the fabric and I used a ribbon instead of more fabric for the hanging tab) to make a Grocery Bag Dispenser.
Actually made two. One for our pantry and one for Rock's room. --For his stinkies if you must know. Although I hope to potty train him soon so it'll be for Shin's stinkies when she is born.I would have gotten more pictures but someone was awful busy hugging the dispensers... I'm glad he likes them.

Saturday, December 26, 2009

NYR Camera Strap Cover

You all had good guesses, but no, this isn't a picture of placemats. Or napkins.
It's my new camera strap cover. I followed the tutorial on Made by Petchy's blog, but made the cover a little bigger than she did so it could accommodate a pocket for the lens cap.
Then I made this one for Susi.

Saturday, December 12, 2009

Preview of NYR


I've finished another NYR.  But I'm giving the same thing as a gift to not one, but two people this Christmas.  So I can't tell you what it is or show you the full picture.  I'll post pictures of what this is after Christmas.  In the meantime, does anyone have any guesses?
(Lynn, Missy and Fix you can't guess 'cause you know what it is!)

Friday, December 11, 2009

Just Kidding!

Britt, the original winner of my giveaway, never got back to me with her mailing address and according to SewMamaSew's Giveaway Day rules, I need to mail out my giveaway items by tomorrow. So I picked a new random number and found Greta who said,
"This is a really cute apron. I hope I win :) Love the laundry room makeover too. You are so right about the one shelf and waste of space. Hummm I might need to look into that."
And when I emailed her that she had won, she got right back to me! So she gets the prize! Okay, no more posts about this giveaway... for now.

Thursday, December 10, 2009

NYR #23, Treeskirt


Like I said, I've been wanting a treeskirt for several years now. And when we decorated our tree last week, it was apparent that there was still something missing. And I didn't want to put bunch a cheesy tablecloth around the base like I do every other year.
My parents recently remodeled their bathroom and my mom decided she didn't want to rehang this quilt in the new space. So she gave it to me and guess what? I made it into a treeskirt!

I found the center of the quilt and drew a 4" circle around it with pencil. I know, I should have used a disappearing ink pen, but the pencil was on this floor and I'm pregnant and tired so it worked.
I used two rulers to draw a straight line to the corner. Yes, with the pencil.
Then I pinned along both sides of the line because the backing was not sewn to the front of the quilt.
Then I cut the line with my rotary cutter.
Then I cut out the circle with scissors.

Then I made six ties about 12" long and satin stitched one of their ends. I pinned the non-satin-stitched ends to raw edges of the quilt, spacing them about 8.5" apart (don't have a good picture of that part!).
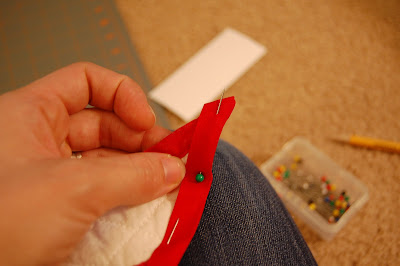
Then I pinned brand new seam binding up the two raw edges of the quilt (where I had just made the cut and where I had attached the ties).

I made sure the ends looked nice and sewed the binding on the edges into place.
After the binding was sewn in place on the two sides, I sewed binding around the edge of the circle. I intentionally made this piece about 24" too long so I could have two 'ties' (really all one piece) to tie the circle together. Make sense? Probably not, but it's not like you guys are all sitting at home with quilts that are the perfect size and color for a treeskirt, are you? If so, contact me and I'll walk you through it.

Does this help? See how it's not another set of ties, but you can still tie it together? And I satin stitched the ends of this piece too.

And here's the finished edge!

And here is the final product. With a very cute model who said "I lay right next to this fabric."

Here it is at the bottom of the tree. Again, I hope you like the cute model I got to lay next to it.

MUCH BETTER than the tablecloth, I now have a treeskirt! And I only have two more NYR's to go!!!

Wednesday, December 9, 2009

Tablecloth


I made my mom this tablecloth for her birthday on the 6th.  She recently put a round table in her red and white kitchen and didn't have a good tablecloth that was big enough to really cover it nicely.


Believe it or not, this beautiful fabric is from IKEA.  I was pretty pleased with how well the pattern matching turned out.  That's one more project checked off my never-ending list of projects...

Monday, December 7, 2009

NYR #22, Twill Tape Ties Tutorial

Does anyone else have a problem with their duvet moving around inside of their duvet cover?  We were really getting tired of our duvet bunching down to the bottom of the bed.  I read about this solution years ago on the Martha Stewart Living website, but I've adapted her advice and created my own tutorial.

To do this project you will need:
(1) Package of twill tape in a color to match your duvet (for me it's white to match my boring white duvet)
(2) Spools of thread in contrasting colors
Hot glue gun or fray check
Sewing Machine
Scissors

STEP ONE: Cut (8) eight inch strips of twill tape to make the ties.

STEP TWO: Apply fray check or, as I did, run the slanted end through the tiniest bit of hot glue to stabilize it. 
STEP THREE: Beginning with red, I sewed a small box (or you could just sew a straight line) on four of ties.  Then I switched to the pink thread and sewed pink onto the other four pieces.

 **If you have two different colors of fabric markers you could just draw lines on the ties.**
 
STEP FOUR: Beginning with one red tie, fold over the end (without colored thread) 1/4 inch. Then pin it to one bottom right corner of your duvet and sew away.

Really.  Go to town sewing back and forth so this sucker won't rip off.  Repeat with another red tie on the other bottom corner.  Then move to the top of your duvet and sew two pink ties to the top corners of the duvet.

STEP FIVE:  Now you will attach the remaining four ties to inside of the duvet cover.  To do this, flip the duvet cover inside out, fold over the non-colored end of the tie 1/4 inch, pin it to a corner of the duvet cover in the seam allowance and sew away again.  Make sure that you use the red twill tape on the bottom of the the duvet cover and the pink on the top.

STEP SIX: Tie the twill tape pieces on the duvet cover to the matching twill tape pieces on the duvet - pink to pink and red to red.

STEP SEVEN: Flip the duvet inside of the duvet cover and you are done!  It's still boring white (perhaps an update is due in 2010?) but at least the duvet is now staying in place.

Winner of the Giveaway!


The giveaway is all done and we have a winner - Britt who said
"My sister would love those!! Sign me up."
Britt, I hope your sister really does love them -- and get back to me soon with a mailing address so I can send them out!  And thank you to everyone else who entered the giveaway -- it was so fun to read all your encouraging comments.  Merry Christmas to all!

Wednesday, December 2, 2009

Apron and Napkins GIVEAWAY!

Hello Everyone! I'm finally doing a giveaway! The first item I'm giving away is this adorable half apron. I made this awhile ago but never found the right person to give it to you so now you have a chance to win it!The apron features two pockets. I've never been sure what you are supposed to put into apron pockets. Dirty spoons? Recipe cards? Regardless, there are two deep pockets for you to use as you please.
Don't worry you will probably look much cuter in the apron because you are not in the awkward "Does-she-have-a-gut-or-is-she-pregnant?" phase of life.
I also made a set of eight matching napkins. That is, they match each other and they match the apron in a creamy white color with a black ribbon detail.
To enter the giveaway:

1) Just leave a comment with your email address so I can contact you if you win.  (I promise will not abuse your email address or sell it to anyone or any organization.)
2) Become a follower of this blog.  If you do this, leave a second comment to let me know that you are following!  If you are already a follower, remind me in a comment!
Deadline to enter is December 6th at 11:59 pm EST.  The winner will be chosen at random. Sorry, but at this time I am not able to ship internationally.  Thanks for stopping by and entering this giveaway!  Come back again soon!
UPDATE: GIVEAWAY IS NOW CLOSED AND A WINNER HAS BEEN SELECTED AND CONTACTED!  THANKS SO MUCH FOR ALL THE ENTRIES AND ALL OF YOU WHO BECAME NEW FOLLOWERS!  MERRY CHRISTMAS TO ALL!

Saturday, November 28, 2009

Stay Tuned...

SewMamaSew's Annual Giveaway Day is coming up on December 2nd. It's a fabulous day when people all over the blogging world giveaway fabulous things, gifts, food, craft supplies. Anyway, this year I am going to participate! I've had a lot of fun with this little design blog and I've got a few little somethings I would love to giveaway to one of you readers so... check back on December 2nd and enter to win!

Friday, November 27, 2009

NYR #21, Laundry Makeover

Our laundry room has served us well and we are ever so grateful for all the many loads of laundry that have been cleaned in this space. But while it functions fine enough, it's never really lived up to it's full potential.
With just one shelf, there was a lot of unused space up above. And it was nothing lovely to look at. Thus I decided to take it on as NYR #21.
The first step was to buy a crow bar. Which made me wonder how we had we survived without one for so long?! Then we ripped out the shelf and the strip of wood that was supporting it. This left the walls looking pretty rough.
Thankfully I had a cute helper to do the spackling for me. Okay to be honest, he was the one wielding the crow bar too. I just can't handle hard labor with this bun in my oven.
Then my cute spackler went to the SBL Conference for the weekend. So I did the next few steps on my own. The liquid laundry detergent was leaking a few months back and we didn't know it until it created this nastiness. The floors were also rather yucky.
After I cleaned the mess, I primed twice and painted twice and we were ready to hang up the shelves when my helper got back from New Orleans.We located the studs in the closet and placed brackets on the shelves accordingly. These shelves were in the AS IS section at Ikea - $1.99 each! I was VERY THANKFUL for my husband who stayed up 'til 2 am on Thanksgiving Eve to help me hang them.
TA DA! Our Laundry Room makeover is complete!
Because we have so much extra space, we moved the cleaning supplies from the pantry and the extra toilet paper and extra tissues from the hall closet.Likewise, all the extra filters, paper towels, dish soap, shoe polish, etc. that were crammed in various places around the house have a new home here.
And did you see what's in the middle of the bottom shelf?! MORE SPACE!!!And with the extra space I made in the pantry...
I was able to move the cookbooks out of sight!
Thank you again to my cute helper for helping make this laundry dream a reality!p.s. I am tempted to make cute fabric covered boxes to hyper-organize everything and make it look cute, but based on this article I recently read, I will resist that urge. Besides the best part about this laundry room is that I CAN HIDE IT BEHIND CLOSED DOORS!