

Like I said, I've been wanting a treeskirt for several years now. And when we decorated our tree last week, it was apparent that there was still something missing. And I didn't want to put bunch a cheesy tablecloth around the base like I do every other year. 

My parents recently remodeled their bathroom and my mom decided she didn't want to rehang this quilt in the new space. So she gave it to me and guess what? I made it into a treeskirt!


I found the center of the quilt and drew a 4" circle around it with pencil. I know, I should have used a disappearing ink pen, but the pencil was on this floor and I'm pregnant and tired so it worked.

I used two rulers to draw a straight line to the corner. Yes, with the pencil. 

Then I pinned along both sides of the line because the backing was not sewn to the front of the quilt.

Then I cut the line with my rotary cutter. 

Then I cut out the circle with scissors.

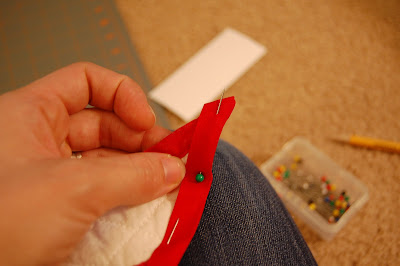
Then I made six ties about 12" long and satin stitched one of their ends. I pinned the non-satin-stitched ends to raw edges of the quilt, spacing them about 8.5" apart (don't have a good picture of that part!).

Then I pinned brand new seam binding up the two raw edges of the quilt (where I had just made the cut and where I had attached the ties).

I made sure the ends looked nice and sewed the binding on the edges into place. 

After the binding was sewn in place on the two sides, I sewed binding around the edge of the circle. I intentionally made this piece about 24" too long so I could have two 'ties' (really all one piece) to tie the circle together. Make sense? Probably not, but it's not like you guys are all sitting at home with quilts that are the perfect size and color for a treeskirt, are you? If so, contact me and I'll walk you through it.

Does this help? See how it's not another set of ties, but you can still tie it together? And I satin stitched the ends of this piece too.

And here's the finished edge!

And here is the final product. With a very cute model who said "I lay right next to this fabric."

Here it is at the bottom of the tree. Again, I hope you like the cute model I got to lay next to it.

MUCH BETTER than the tablecloth, I now have a treeskirt! And I only have two more NYR's to go!!!
4 comments:
Ok, I was with you through the pencil drawing and cutting, but once you got into the ties, I was lost. But you are right, even though I may have quilts or something I would like to make into a tree skirt, I would never attempt this.
Although my $3 Walmart clearance tree skirt I got from last year's after-Christmas sale may end up being a bust. It is very small which means it barely covers the tree stand. We always put plastic tarps down underneath of the tree stand to protect our wood floor from water damage (just in case) and my tiny little tree skirt just doesn't cover it all or fit around the stand. Oh well. You can't tell unless you get down close to look.
But anyway, just wanted to say yours looks GREAT and is much nicer than my $3 mini-me tree skirt from Wal-Mart! ;)
~annie
You're brilliant. I'm currently using a table runner. I think our skirt got lost in the move along with our star and Molly's stocking. So, We're looking a bit shabby: star-less tree, table runner-skirt, and only one stocking. I'm looking forward to after Christmas sales!
-cec
Nicely done. =) And I love how Rock calls it fabric, not a blanket or a quilt. He has a seamstress mama.
You are a flipping genius. I love it! And you recycled while you were at it. Good job, Rachel!
Post a Comment